Peek-a-Window
Oh my, a 3-day weekend. How I miss thee. After the absence of a real holiday since, well, the “holidays,” this long weekend is quite a treat. My husband is currently in Italy for work, so the lady felines and I are enjoying the sun, the breeze and taking in the solitude. Mmmmm, breathing it in…deeply. Time to catch up…and time to make sangria and write.
The weather is surely changing and the light is shifting oh-so slightly. I took some time this weekend to water and to rearrange my orchids and my cacti. My Dendrobiums needed to come out of the cool bathroom into the sunlit living room and my Phalaenopsis orchids needed to take a comfortable backseat elsewhere. My elderly, fragrant rose and lemon geraniums have also made their way into our bedroom and are currently peeking out beneath the sailcloth curtains. I will write a post soon about current updates and new acquisitions, but today I wanted to share some exciting tid-bits that have previously occurred this spring.
After the cooler weather has disappeared and the last chill has run up my spine, new growth and new roots have finally emerged. A lot of orchids are active throughout the winter and early spring, but things really do come to life once the breeze starts flowing through the windows. Taking a moment to observe the smallest growth brings the widest, wildest smile to my face. Hey, hey! You girls are finally perking up!
 Above, Vanda coerulea‘s velamen slowly begins to absorb water after an early evening misting. I usually water and mist in the morning, but if I do mist in the evening, it has to be warm out with a slight breeze. This ensures that most of the moisture is gone once the sun goes to bed. The older root is on the left, the new root is on the right. Why does every part of an orchid look so sexy?
To elaborate slightly on velamen – when misting and watering your hanging orchids, take a a moment to moisten the velamen that covers the roots first. These tough, protective, outer cells take time to soften and absorb moisture. After doing this, the roots are ready to fully absorb the water that they need. Soak once, let them sit for a few minutes and then soak again.
 A little over a month ago, one of my dearest friends ventured to Europe for a very special wedding celebration. While she was gone, I spent a lot of time with her beautiful pastel tortoiseshell cat, Olive and cared for her extensive plant collection. As a thank you surprise, she thoughtfully brought me back a box of Choc Noisettes. I will admit, I am more of a savory girl, but damn…these were very special in my mouth. First thought: Wow, these look amazing and they taste incredible. Second thought: Wow, these look like Hydroton (one of my favorite orchid potting mediums!)
Unfortunately, my husband concurred with the first thought and ate twenty pieces the first morning before I awoke. I have had the remainder of them hidden ever since. That was, until I started writing this post. I just ate the rest of them and found the link to share with you.
 And of course, with the warmth comes sharing and caring. Uni and Ora will cuddle up during the long winter and then they will have a few odd weeks of hierarchy once spring has sprung. Pecking orders come and go but once the windows are open they have to team up to swat moths. These bits of protein really do make their day.
Although we do have screen on the bottom of the windows, the top of the windows remain fully open for a few reasons. Unfortunately, my orchid light burnt out in February and it desperately needs to be replaced. This lamp serves a dual function, ensuring rainy day orchid happiness and night-time kitten happiness. A lady has to lure those moths inside for playtime and final consumption during the evening hours.
 Here is Ora basking in the breeze. This was taken during the first weekend when the bathroom window was ajar. She spends the majority of her mornings in here now, watching the mourning doves and taking in whatever rick-rack that is being created by our Brooklyn neighbors.
 And yes, there always has to be room for two. This normally does not last too long, unless something really interesting is going on outside that deserves two pairs of snake eyeballs to witness the encounter.
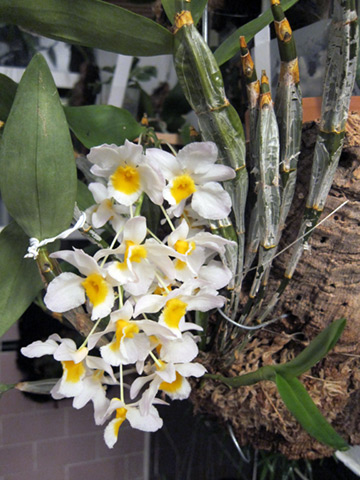
 On an orchid related note, my Oncidium fuscatum shocked me with an unexpected spike. I found the fully grown spike with mature buds one day when I was fussing around in the bathroom window.
When I originally purchased this Oncidium, I had expected to receive the alba version that was pure white with a hint of yellow streaking. Shortly after receiving it, the seller contacted me. His seedlings had just bloomed and they were not what he had anticipated. I was slightly disappointed, but I guess I had to be okay with this. The blooms are gorgeous.
 Please mind the accordion leaves that appear amongst the foliage. Winter within our apartment can be a bit dry here. Now that I have endured my first full winter with most of my orchids, hopefully I can step up my humidity game a little more consistently in the future.
Growing beneath the Oncidium fuscatum on this mount is my NOID Dancing Lady. I am anticipating a parade of yellow blooms, but there seem to be a lot of ‘dancing ladies’ out there. It is a term that is pretty widely used for yellow Oncidiums. Only time will tell.
Originally, I had both of these orchids mounted upright on the vertical vanda baskets that I had made with my Mum during Easter of 2013. I removed the cork from the bottom of the baskets, only because they were taking up a lot of precious window space. The roots were entangled around the cork so wildly, I just added some additional sphagnum and strung them upright. Topsy-turvy, they seem to be happy.
 This first spike has since passed, but I was rewarded with a second spike full of blooms. Today, it is still blossoming. The flowers opened up a lot more on the current spike and are not as compact. There were about 4 – 6 blossoms on each spike. Her little flowers remind me of bite-sized peanut butter and jelly sandwiches. Maybe with a little banana and marshmallow added for good taste.
 After raising many questions about the happiness of my Dendorbiums this winter, Dendrobium farmeri kindly responded to the care that she received. On the other hand, Dendrobium jenkinsii, Dendrobium capituliflorum, Dendrobium lindleyi, Dendrobium thyrsiflorum remained mum this past season.
I guess the visual silence should have been expected. While becoming established in their new home, plenty of roots have been trimmed and fussed with and they have been moved from baskets to mounts. Becoming comfortably acquainted will take time, especially admist our on-and-off climate.
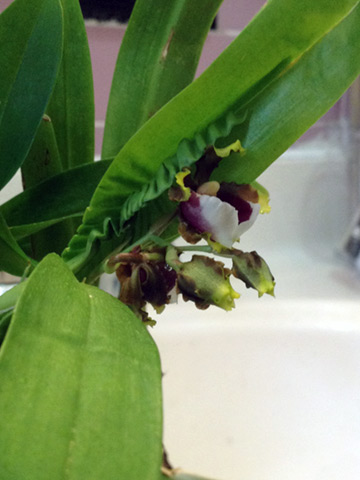
But to my delight, I found a wonderful surprise! Dendrobium farmeri decided to launch her first set of floral fireworks. The display only originated from one pseudobulb, but it was magnificent. It was such a treat to watch this spike progress into full fruition. Initially, I found it hiding beneath a single leaf.
 All along I had expected pink blossoms. The tinge of pink on the buds held the promise of pink flowers. At first this initial appearance had me convinced that my suspicions were correct. Many photos via the internet promised this too…
 Dendrobium farmeri‘s buds matured rather quickly. They grew in both width and length, alongside the new pseudobulb that can be seen on the bottom right.
 As her buds ripened, I was so afraid that they would come tumbling off the spike. They were so delicate, both in formation and color.
 Upon opening, the blossoms were pink, like little delicate piglets. Although there was only one bunch, I was so thrilled.

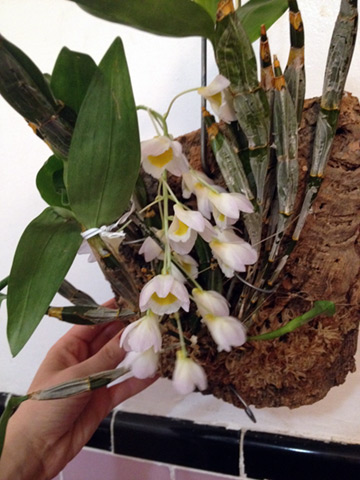
 Once Dendrobium farmeri‘s flowers fully opened, they were quite white. The pink tinge had faded away. After reading a little more, I found out that some varieties only have the pink along their backsides and that some varieties are completely pink. I am unsure if this would be considered an alba variation?
 During the “welcome spring” blooming ruckus, I found a Phalaenopsis gigantea seedling. Instead of paying a few hundred dollars for a large specimen, I figured that twenty dollars for a younger plant seemed a bit more reasonable.
 It is kind of fascinating that this little lady will take years to mature. Eventually her leaves will grow to be a few feet long.
 Phalaenopsis gigantea was shipped to me in a plastic pot packed with bark pieces and sphagnum moss. Upon pulling her from the pot, the dead roots came loose immediately with the old medium. No trimming was needed.
After inspecting the orchid, I washed my cork mount to remove any debris that were hiding within the cracks (aka dead spiders.)

 Initially, I mounted this orchid upside down up. This position seemed organic in terms of crown drainage. I secured her to the mount with a small u-clip. I drilled two holes on each side of the bundle of roots, slipped the hook through and curled the wire on the back of the mount with my pliers.
 Some sphagnum was added to the mount and was then lightly secured with some fishing line.
 After several waterings, I began to question my mounting tactics. I had read that besides being ultra-sensitive to water gathering in her crown, Phalaenopsis gigantea also does not like water in to remain in-between her leaves either.
In comparison to your normal Phalaenopsis breeds, gigantea‘s leaves sit much closer together, almost on top of one another. I decided to flip the mount around. To do this, I just changed the position of the hanger and drilled a hole at the opposite end. With the orchid mounted upright, I can carefully water her roots without any water draining downwards onto the plant.
Fingers crossed, happy spring!

